Overview
The following languages are currently supported by Enwikuna License Manager & Enwikuna License Manager Pro:
| Language | Coverage |
| English | 100 % |
| German (formal) | 100 % |
| German (informal) | 100 % |
WordPress is a versatile platform that allows users to create websites in different languages. The translation of plugins is an important part of this process, as it ensures that the user experience is accessible to people all over the world. Below we would like to explain the basics of translating plugins within WordPress.
WordPress uses the English translation by default if no specific translation is available for the selected language. There are several ways to translate plugins within WordPress:
Translation via translate.wordpress.org
This method is ideal for plugins such as Enwikuna License Manager, which are also uploaded to WordPress.org. Users can register and actively participate in the translation to improve the user experience for others.
Translation via .po file
.po files (portable object files) are standardized translation files that are created on the basis of a .pot file (portable object template file) and are responsible for the translation into a language, e.g. Spanish. In summary, .pot files are templates for translations within plugins. They contain all the strings that need to be translated. Users can translate these files with tools such as Poedit to add or edit translations.
Usage of translation plugins such as WPML
Plugins such as WPML or Loco Translate offer an integrated solution for the multilingualism of websites. Such plugins allow you to translate content directly within WordPress and offer functions such as automatic translation and manual adaptation.
Translation via translate.wordpress.org
All translations of WordPress, WordPress apps, meta pages, themes and plugins hosted on WordPress.org run centrally via translate.wordpress.org. You can find a very interesting article directly from WordPress here, which explains how to use it and points out the special features of the translation. In summary, the following steps are necessary to help with the translation of Enwikuna License Manager:
Registration and login
First, you need to register on wordpress.org and log in to gain access to the translation platform.
Selection of the plugin for translation
After logging in, you can select the Enwikuna License Manager to add or edit translations.
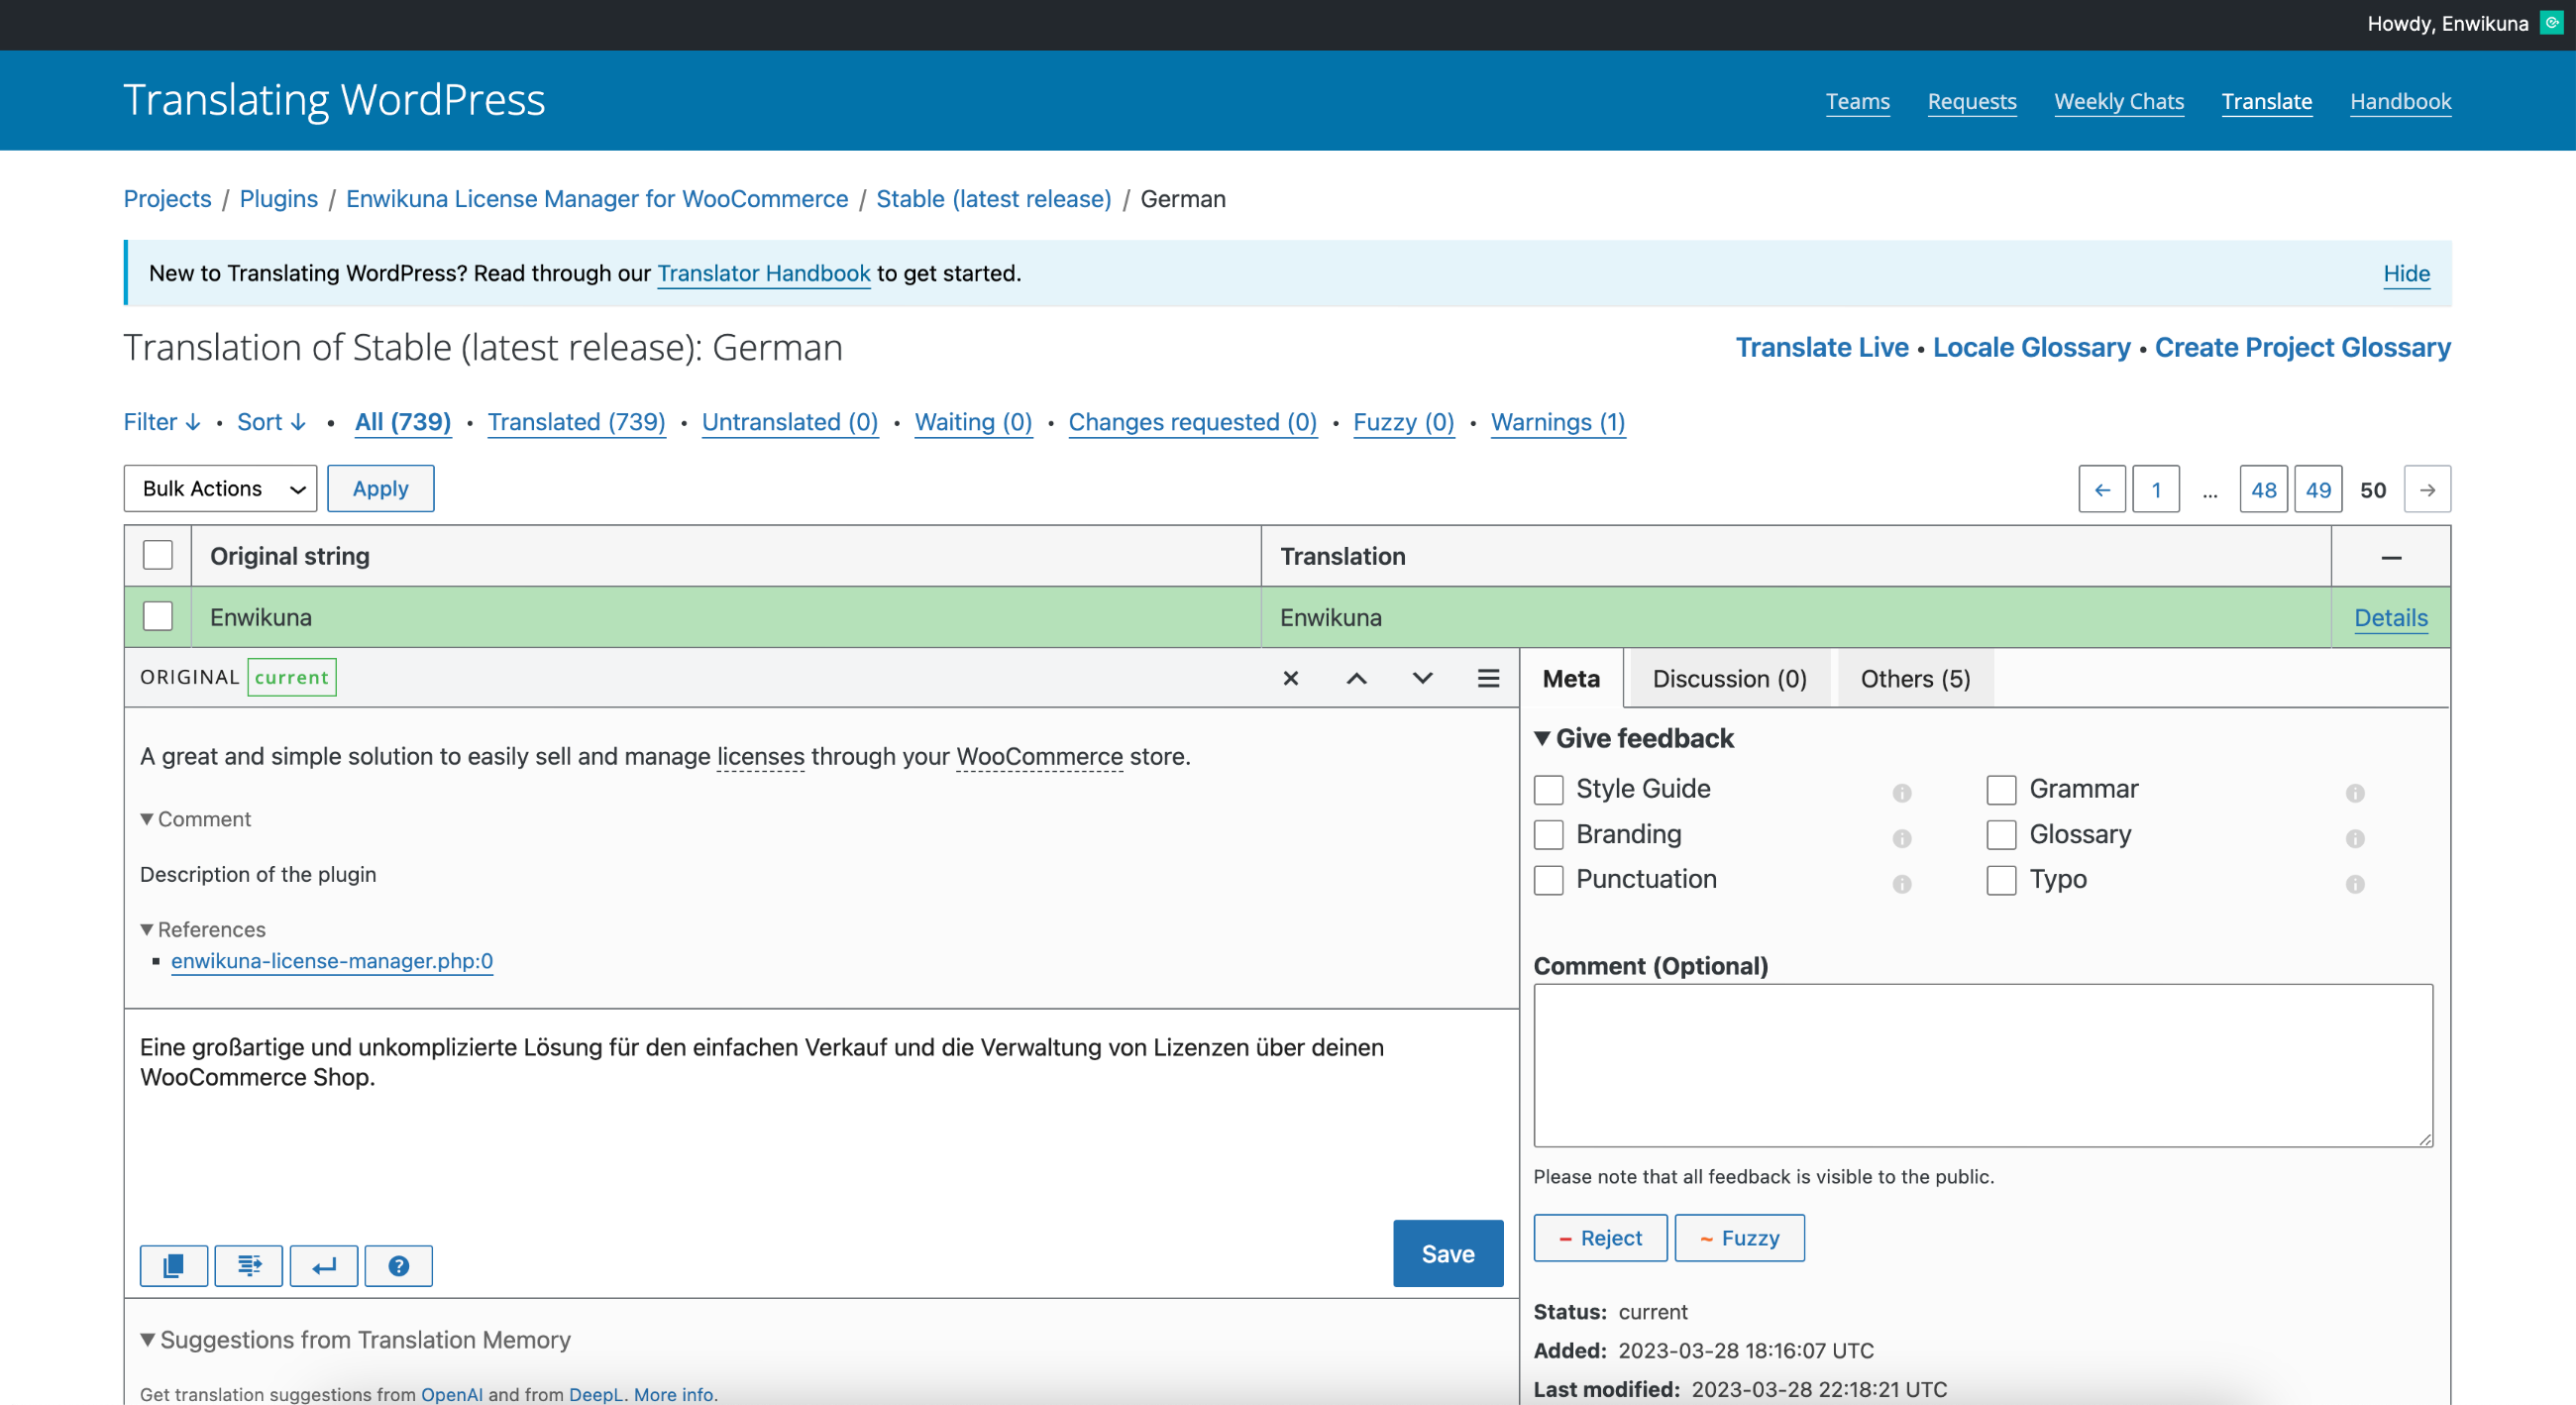
Translation of the strings
Now select the language you want to translate from the list of languages. You will now see a table with some columns. Each column contains a word or sentence that needs to be translated. Double-click on the line to add or edit a translation.
Review and submission
Once the translation is complete, you can check it and submit it for approval.
Note: To help you with the translation, we have written down a few hints here.
Translation via .po file
The creation & customization of translations from plugins in WordPress via a .po file is another common method. This is usually the first choice for plugins that are not listed on wordpress.org. Because in this case, translate.wordpress.org is not available. This method is therefore aimed solely at Enwikuna License Manager Pro. Although it is possible to translate the free basic version Enwikuna License Manager via a .po file, only translate.wordpress.org should be used for the translation in order to avoid errors and to make the translation available to all users.
For translation with a .po file, we recommend Poedit. Poedit is a free, graphical tool for the computer-aided translation of documentation and program interfaces. It is a graphical front end to the tools of the GNU gettext system.
You will find all the files you need right away in the following folder path:
wp-content/plugins/enwikuna-license-manager-pro/i18n/languagesIt is also important that you get an overview of all existing WordPress localizations.
Important ⚠️
Always make a backup copy of your new or edited .po files. If you place or replace them within the original language directory of the plugin, they will be lost after an update of the plugin. Move them to thewp-content/languages/pluginsdirectory instead to preserve them.
Customize an existing translation
Open the folder mentioned above and search for the translation file you want to edit. In this case, only the .po file is important. The files are structured as follows:
enwikuna-license-manager-pro-<locale>.poOpen this file with Poedit. You will now receive a list of strings from the plugin. Search the list for the word you want to change and adjust it according to your needs.
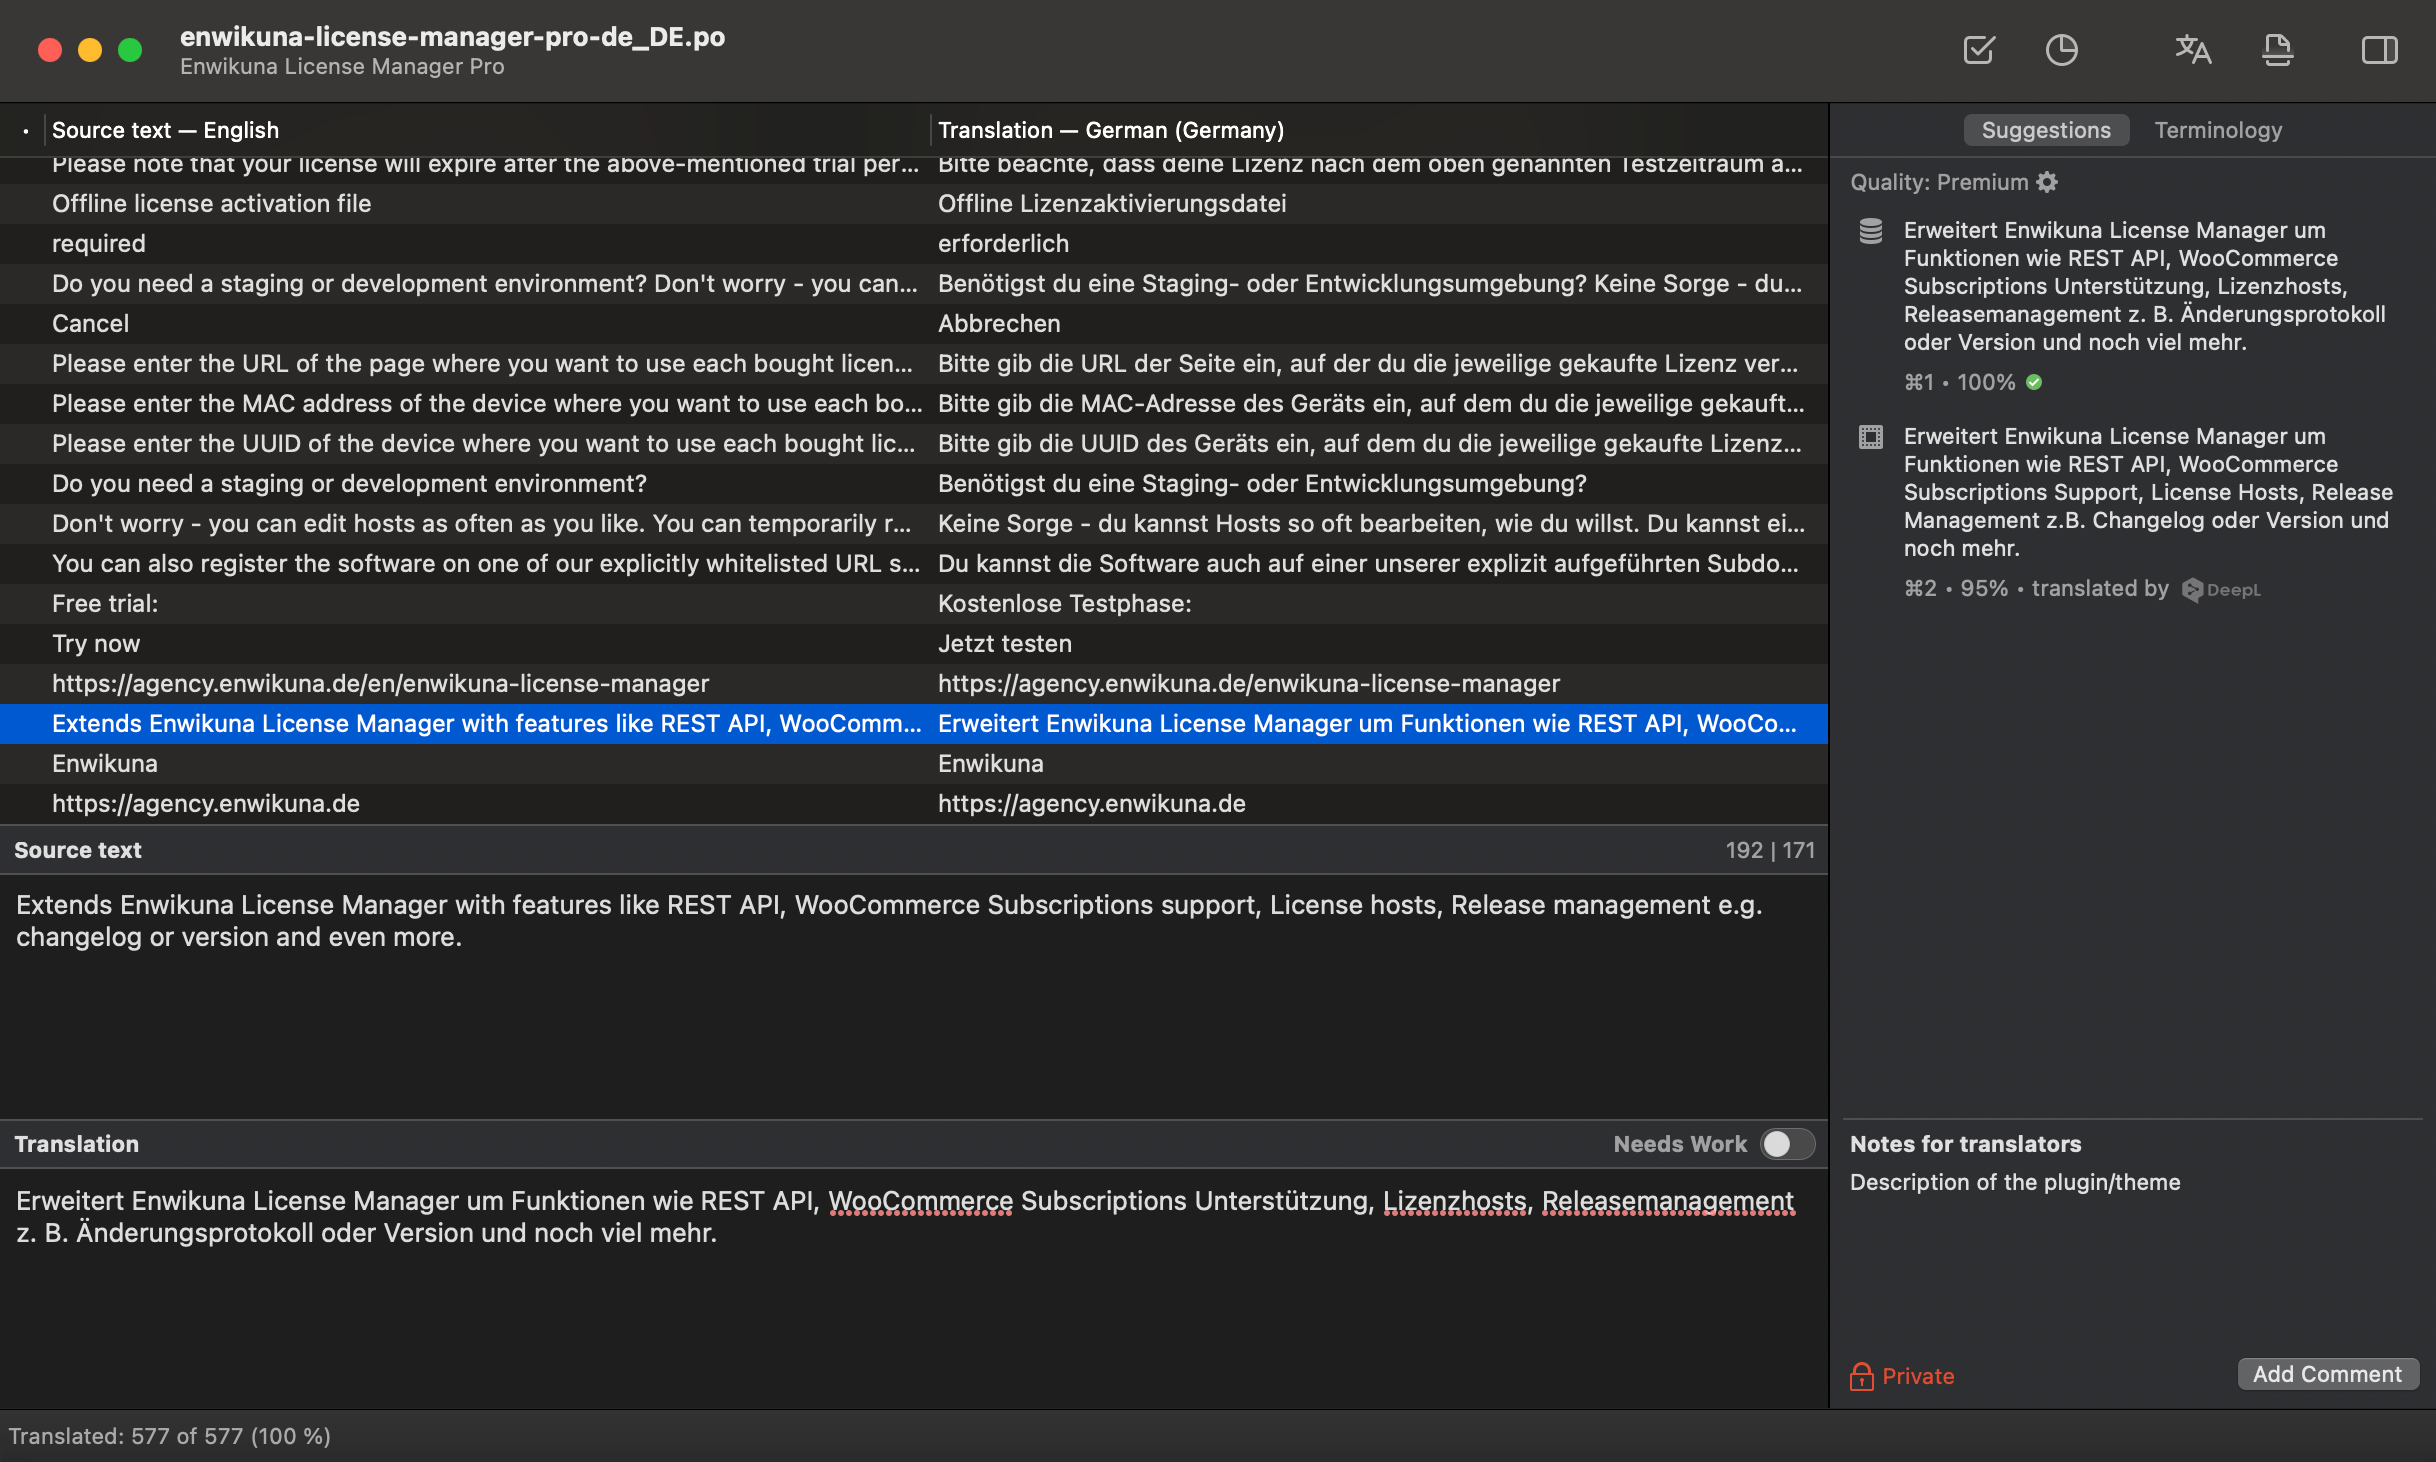
Save the translation afterwards.
Create a new translation
If no translation exists for a language, you must first create one. For this purpose, we have stored a .pot file inside the folder mentioned above. This serves as a template for a new translation and contains all the strings to be translated. Open this file with Poedit. As you can see, this file contains exactly the same list as when editing a translation, with the difference that this file does not contain a translation.
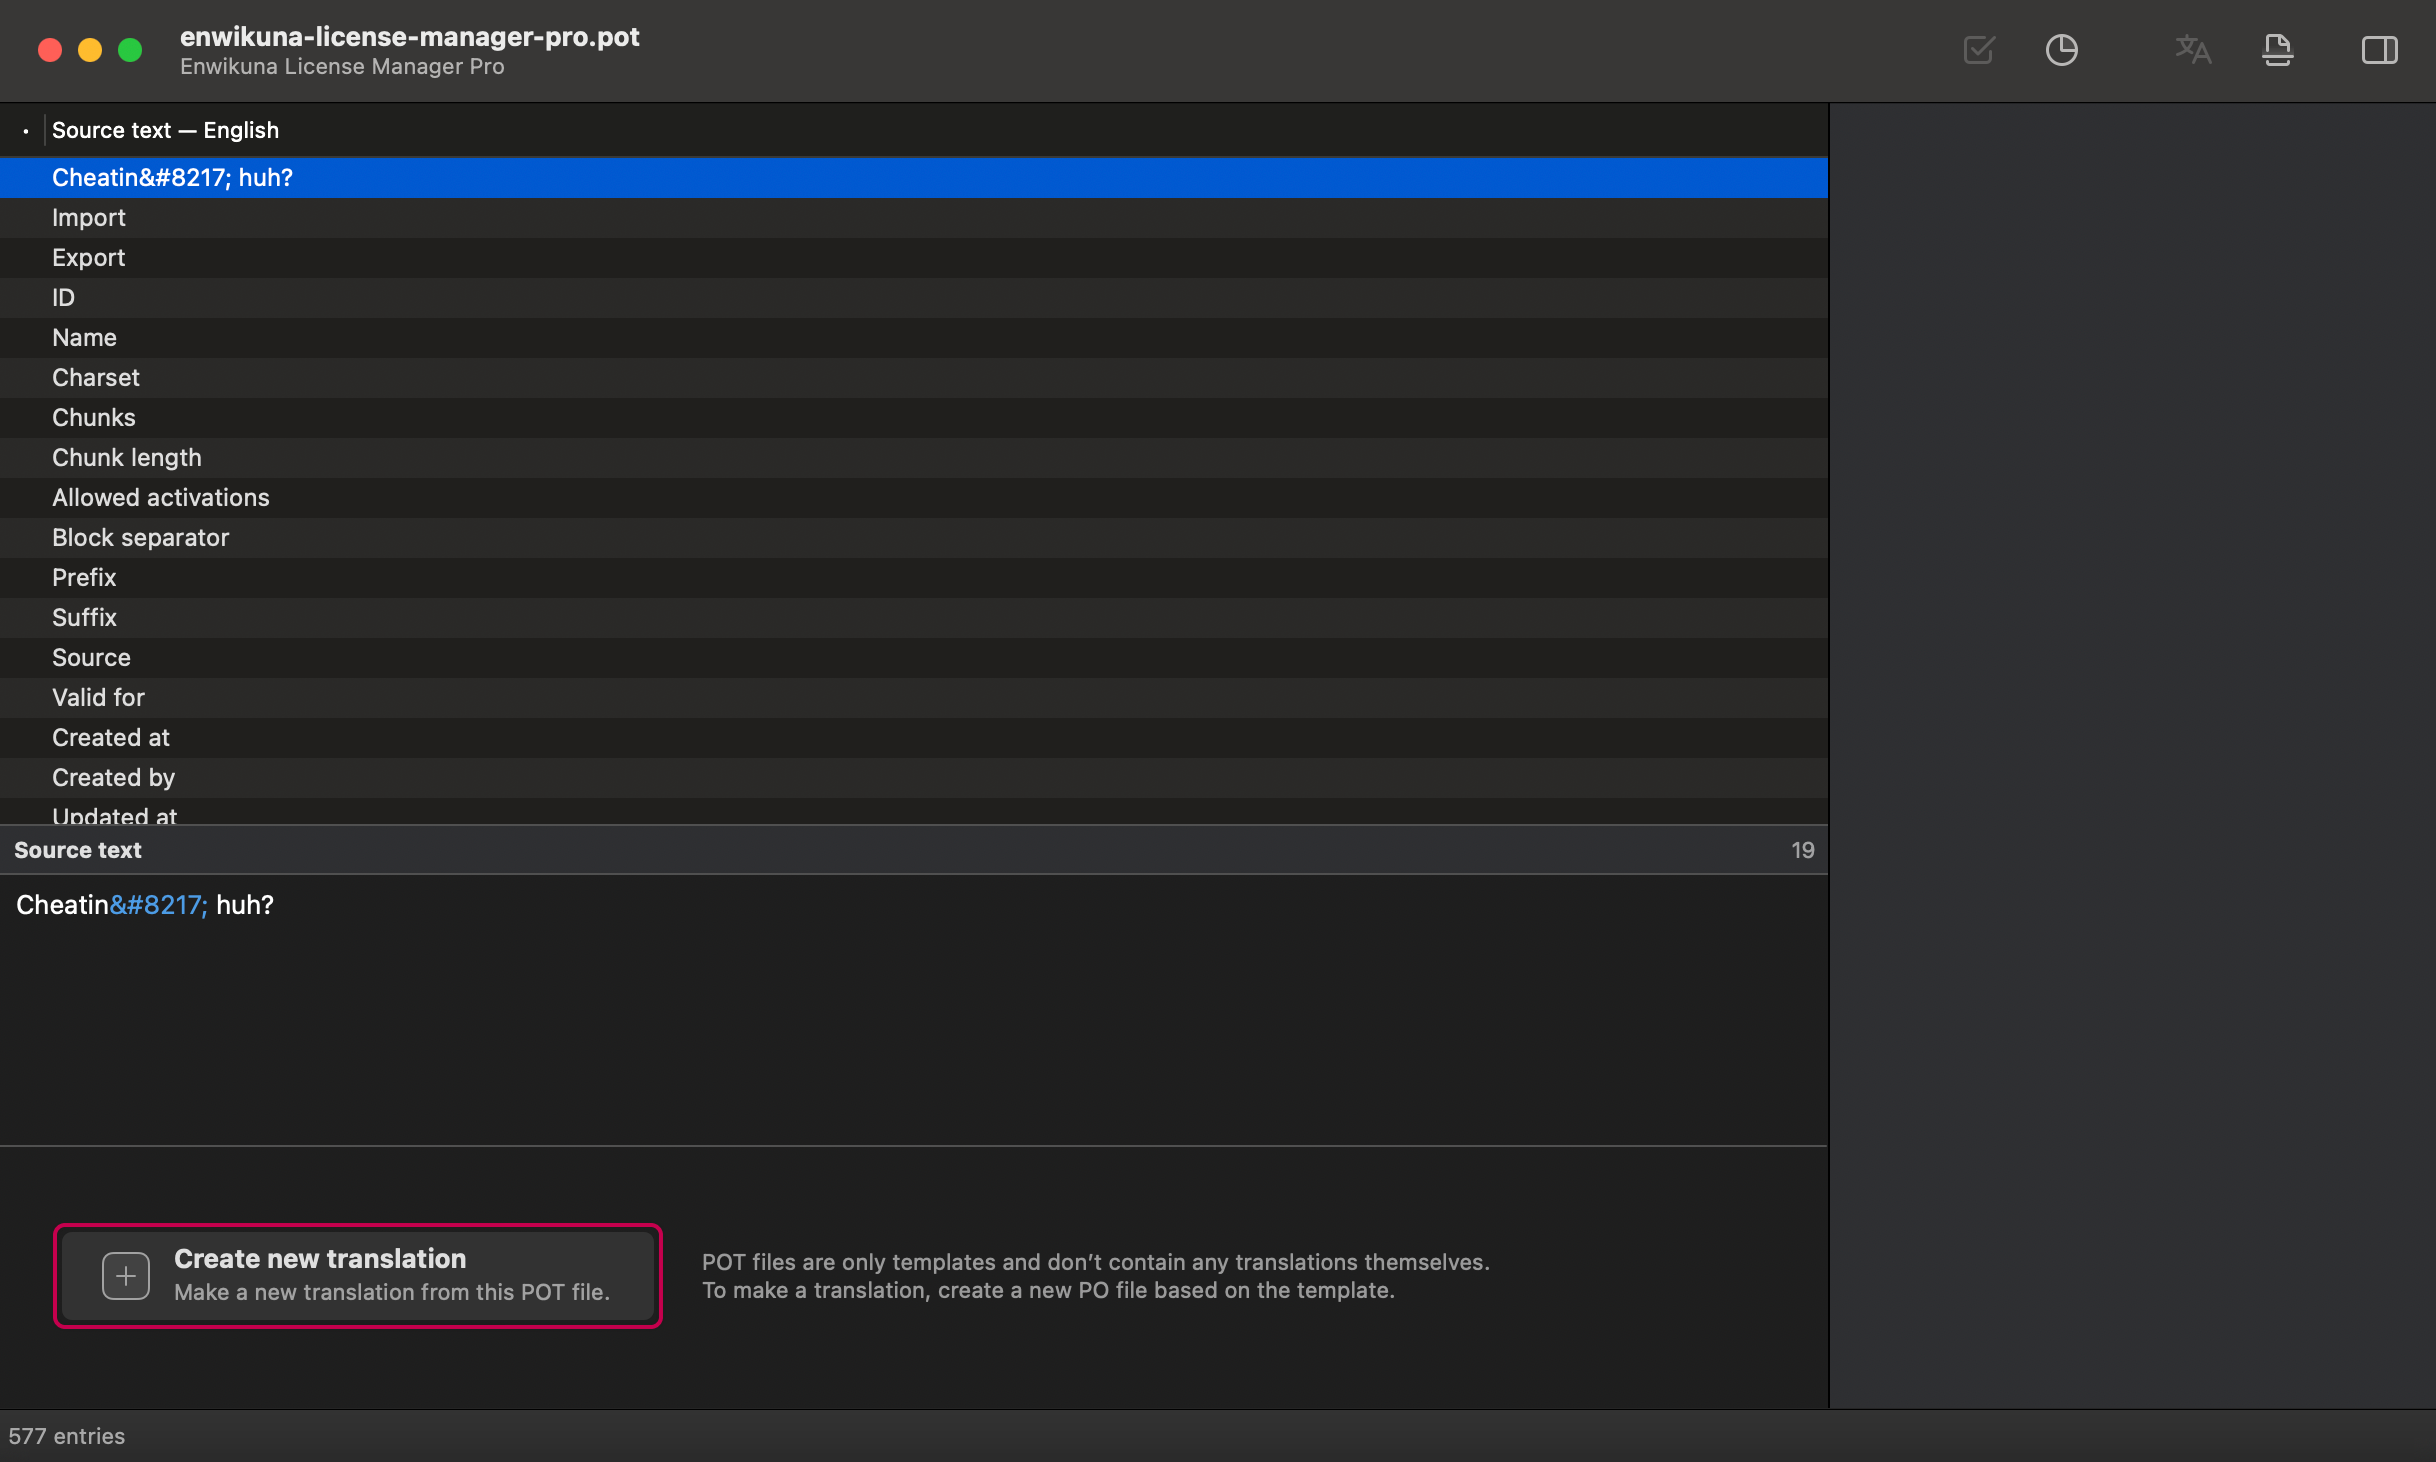
Instead of a field for entering a translation, a button for creating a new translation is displayed. After clicking on this button, you can now choose from a list of languages. Select the language you want to translate here.
A similar window will then open, but you can now enter a translation.
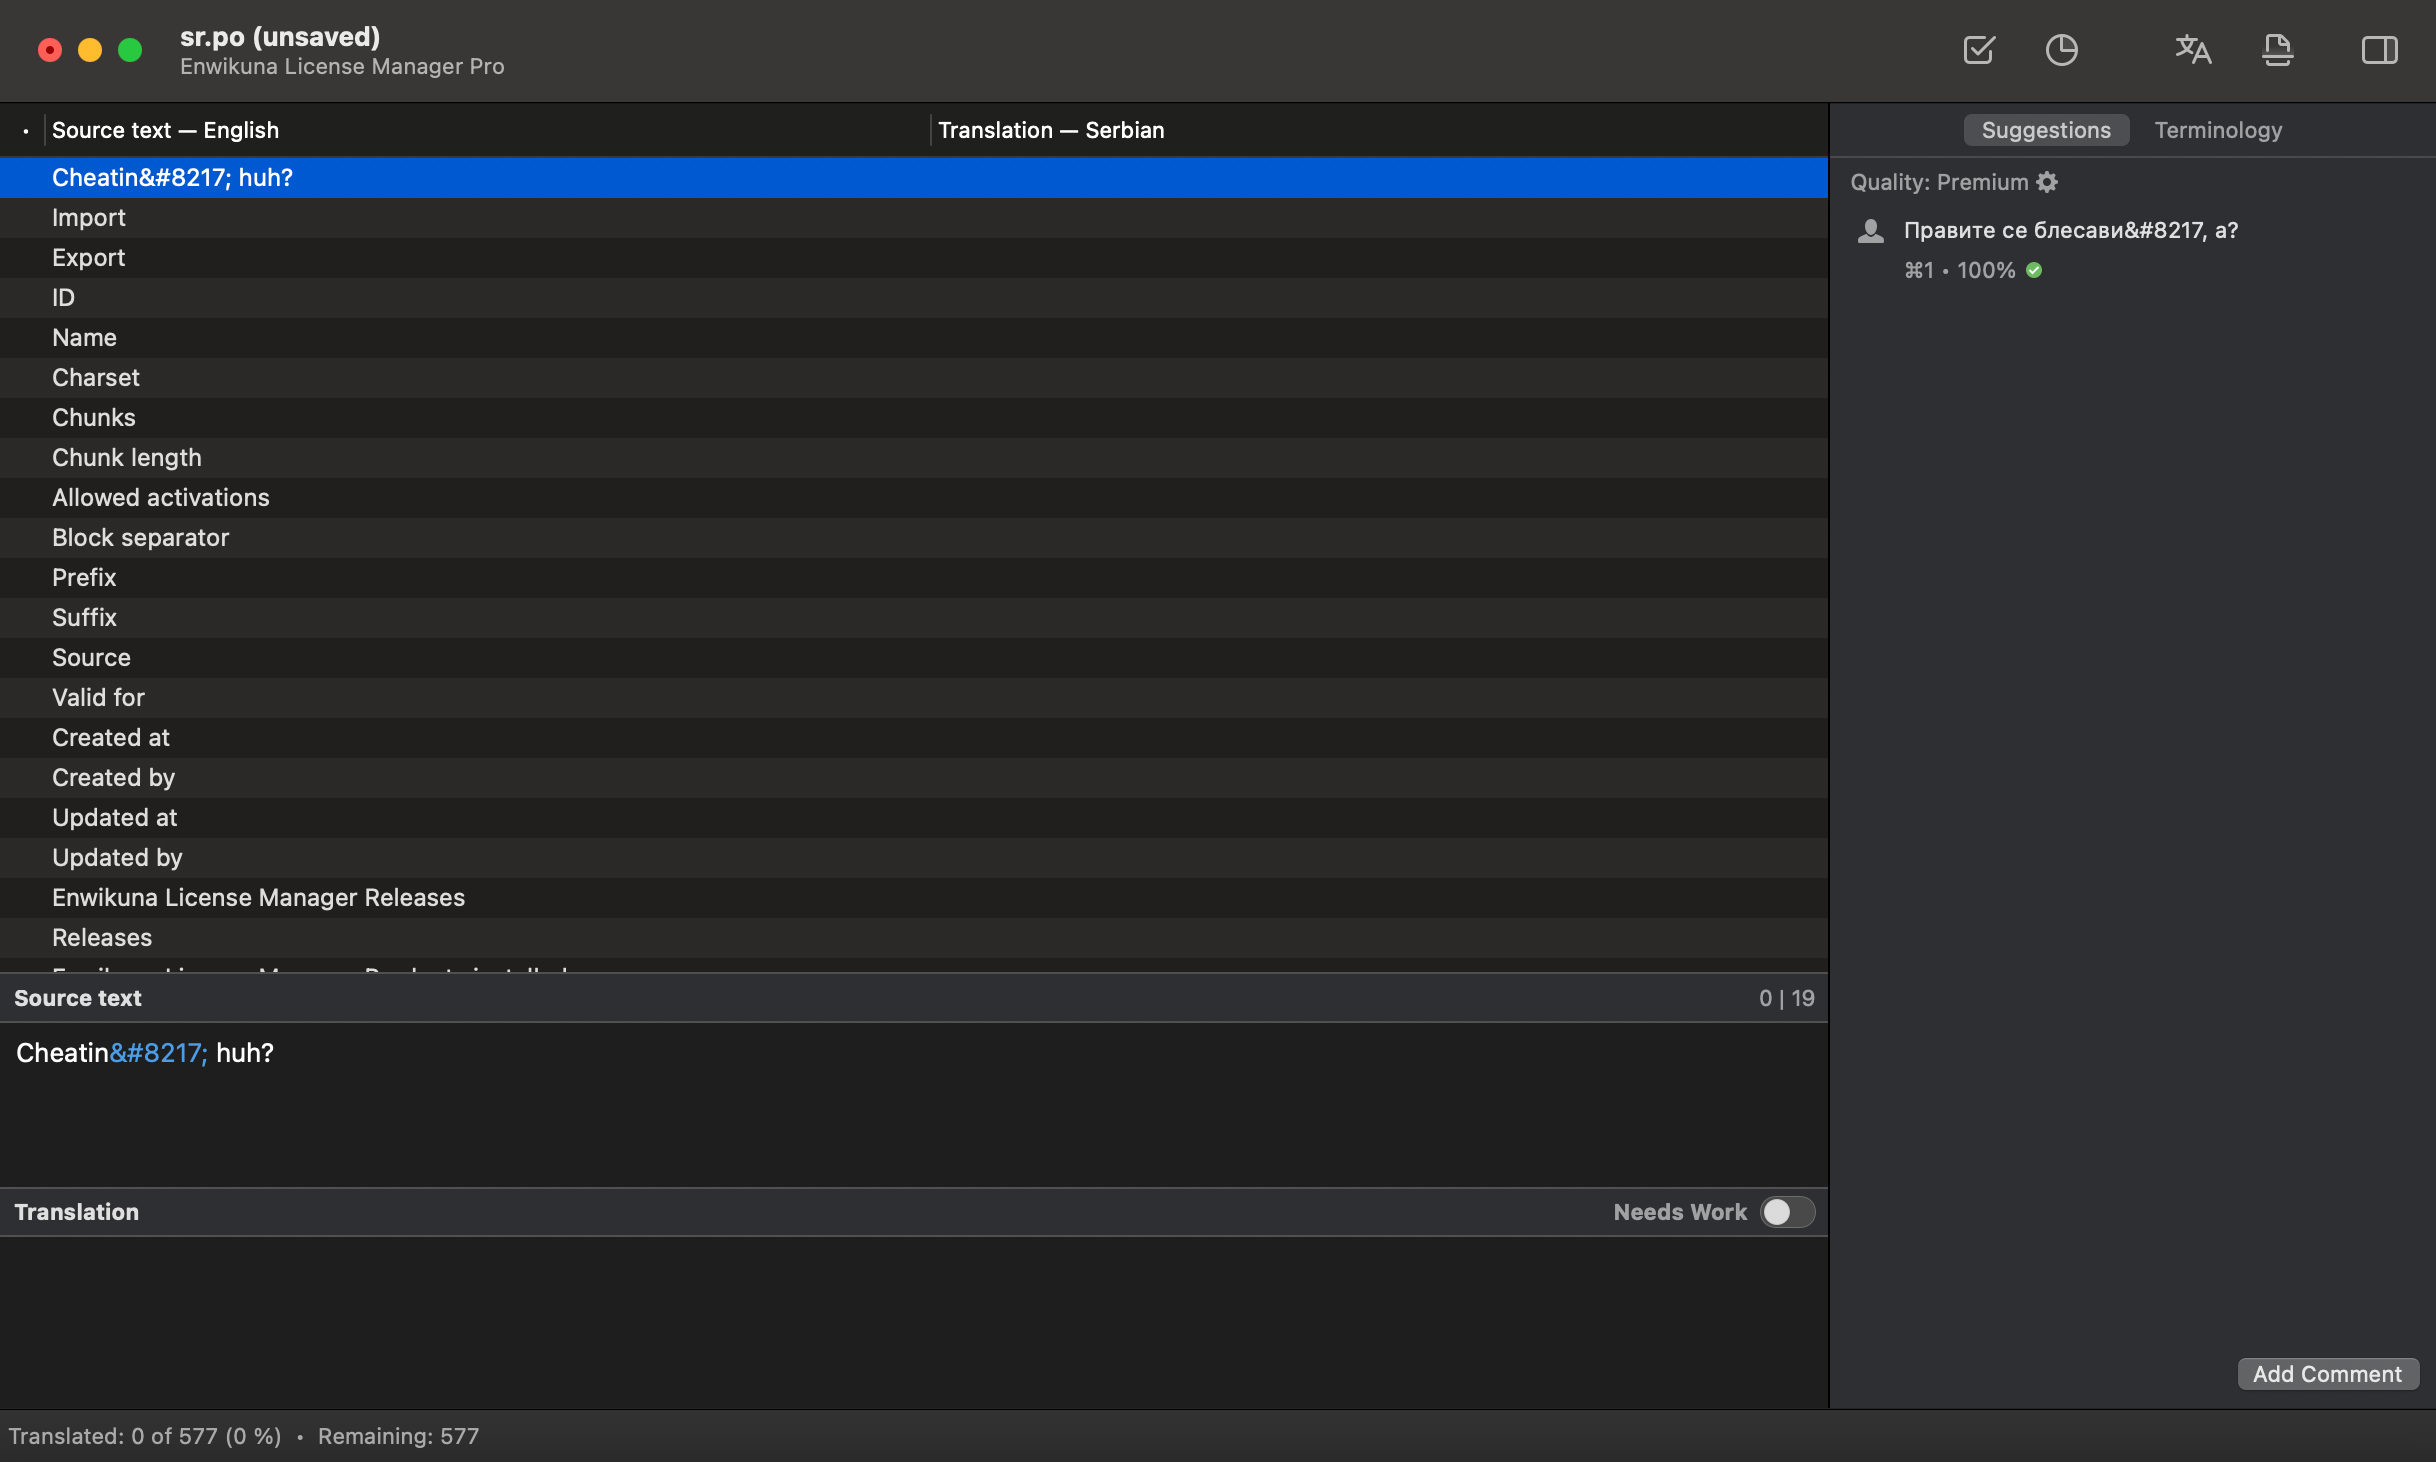
Once you are finished, save the translation. You will now be asked to name the file. You must strictly adhere to the WordPress naming convention, i.e. the file name must begin with enwikuna-license-manager-pro- followed by the localization code for your language (e.g. for German it’s de_DE, a list of all localizations can be found here). Otherwise, WordPress will not be able to load your translation.
Make sure that your language is selected correctly within the general settings of WordPress. Your new translations should be loaded immediately.
Update your own translations
Assuming you have already translated the plugin into your language or made changes a few versions ago. After that there was a new update and therefore a lot of new strings, which are not included in your translation.
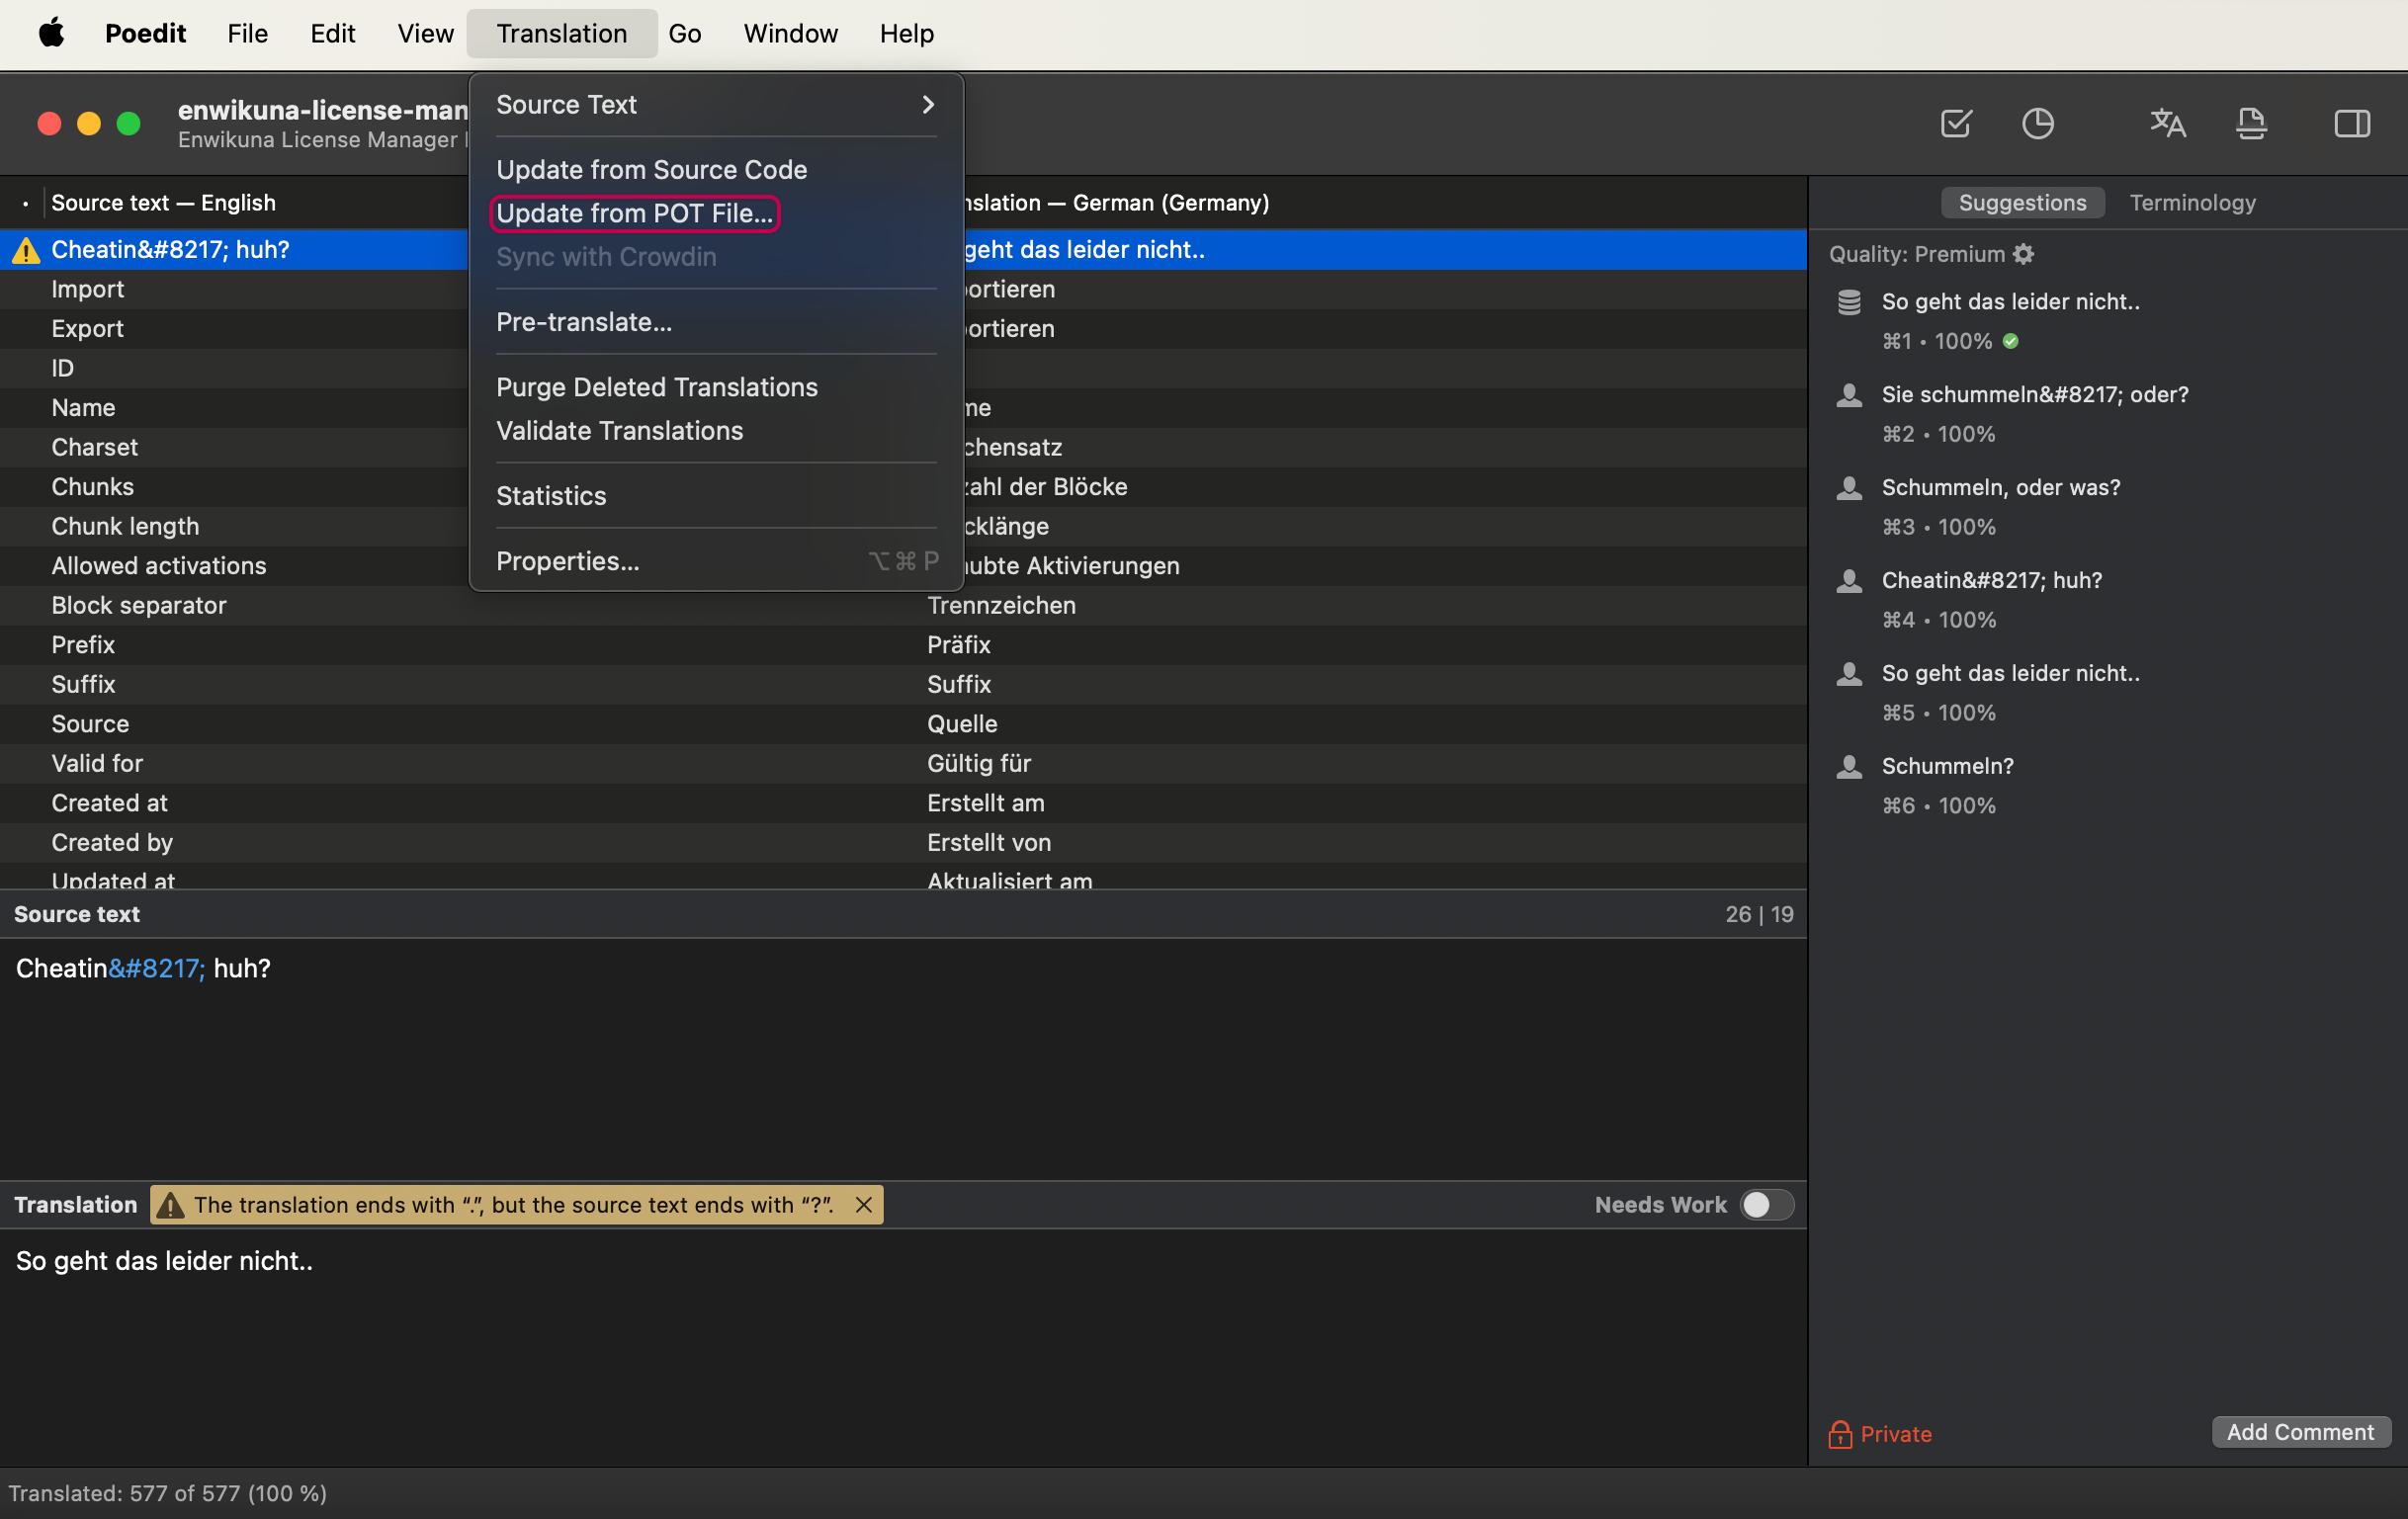
To fix this, simply open your custom .po file with Poedit, go to the translation menu and update your translation using the current .pot file from the last update. Your translation will now be updated. Once you are done, you can translate the new strings into your language and save the file when you are satisfied.
Translation via WPML
WPML is a comprehensive multilingual solution for WordPress websites. Enwikuna License Manager & Enwikuna License Manager Pro have been seamlessly integrated into WPML during development to provide you with a unique and perfect user experience when customizing translations. This also applies to the translation of license settings inside WooCommerce products, which runs completely automatically.
Since WPML is a paid plugin, you have to buy it first. Afterwards you have to install & configure it on your WordPress website. You will need the following WPML extensions to fully translate Enwikuna License Manager & Enwikuna License Manager Pro:
- WPML Multilingual CMS (required)
- WPML String Translation (required)
- WooCommerce Multilingual & Multicurrency (required)
- WPML Media (optional)
After you have successfully installed & configured WPML, you can now extend and customize the translation of Enwikuna License Manager & Enwikuna License Manager Pro.
Customize admin texts
With the email notifications included within Enwikuna License Manager & Enwikuna License Manager Pro, some new emails will be added to WooCommerce. You can edit these emails like normal emails inside the WooCommerce settings. Generally, all emails are already translated. However, if you add to or change the content of the emails, you must then adjust the translation using WPML.
We offer the following text settings for translation:
- woocommerce_elm_wc_licenses_settings
- woocommerce_elm_wc_license_expires_soon_settings
- woocommerce_elm_wc_license_expired_settings
- woocommerce_elmp_wc_trial_license_settings
- woocommerce_elmp_wc_trial_license_request_unapproved_settings
- woocommerce_elmp_admin_wc_new_trial_license_request_settings
- woocommerce_elmp_admin_wc_new_trial_license_settings
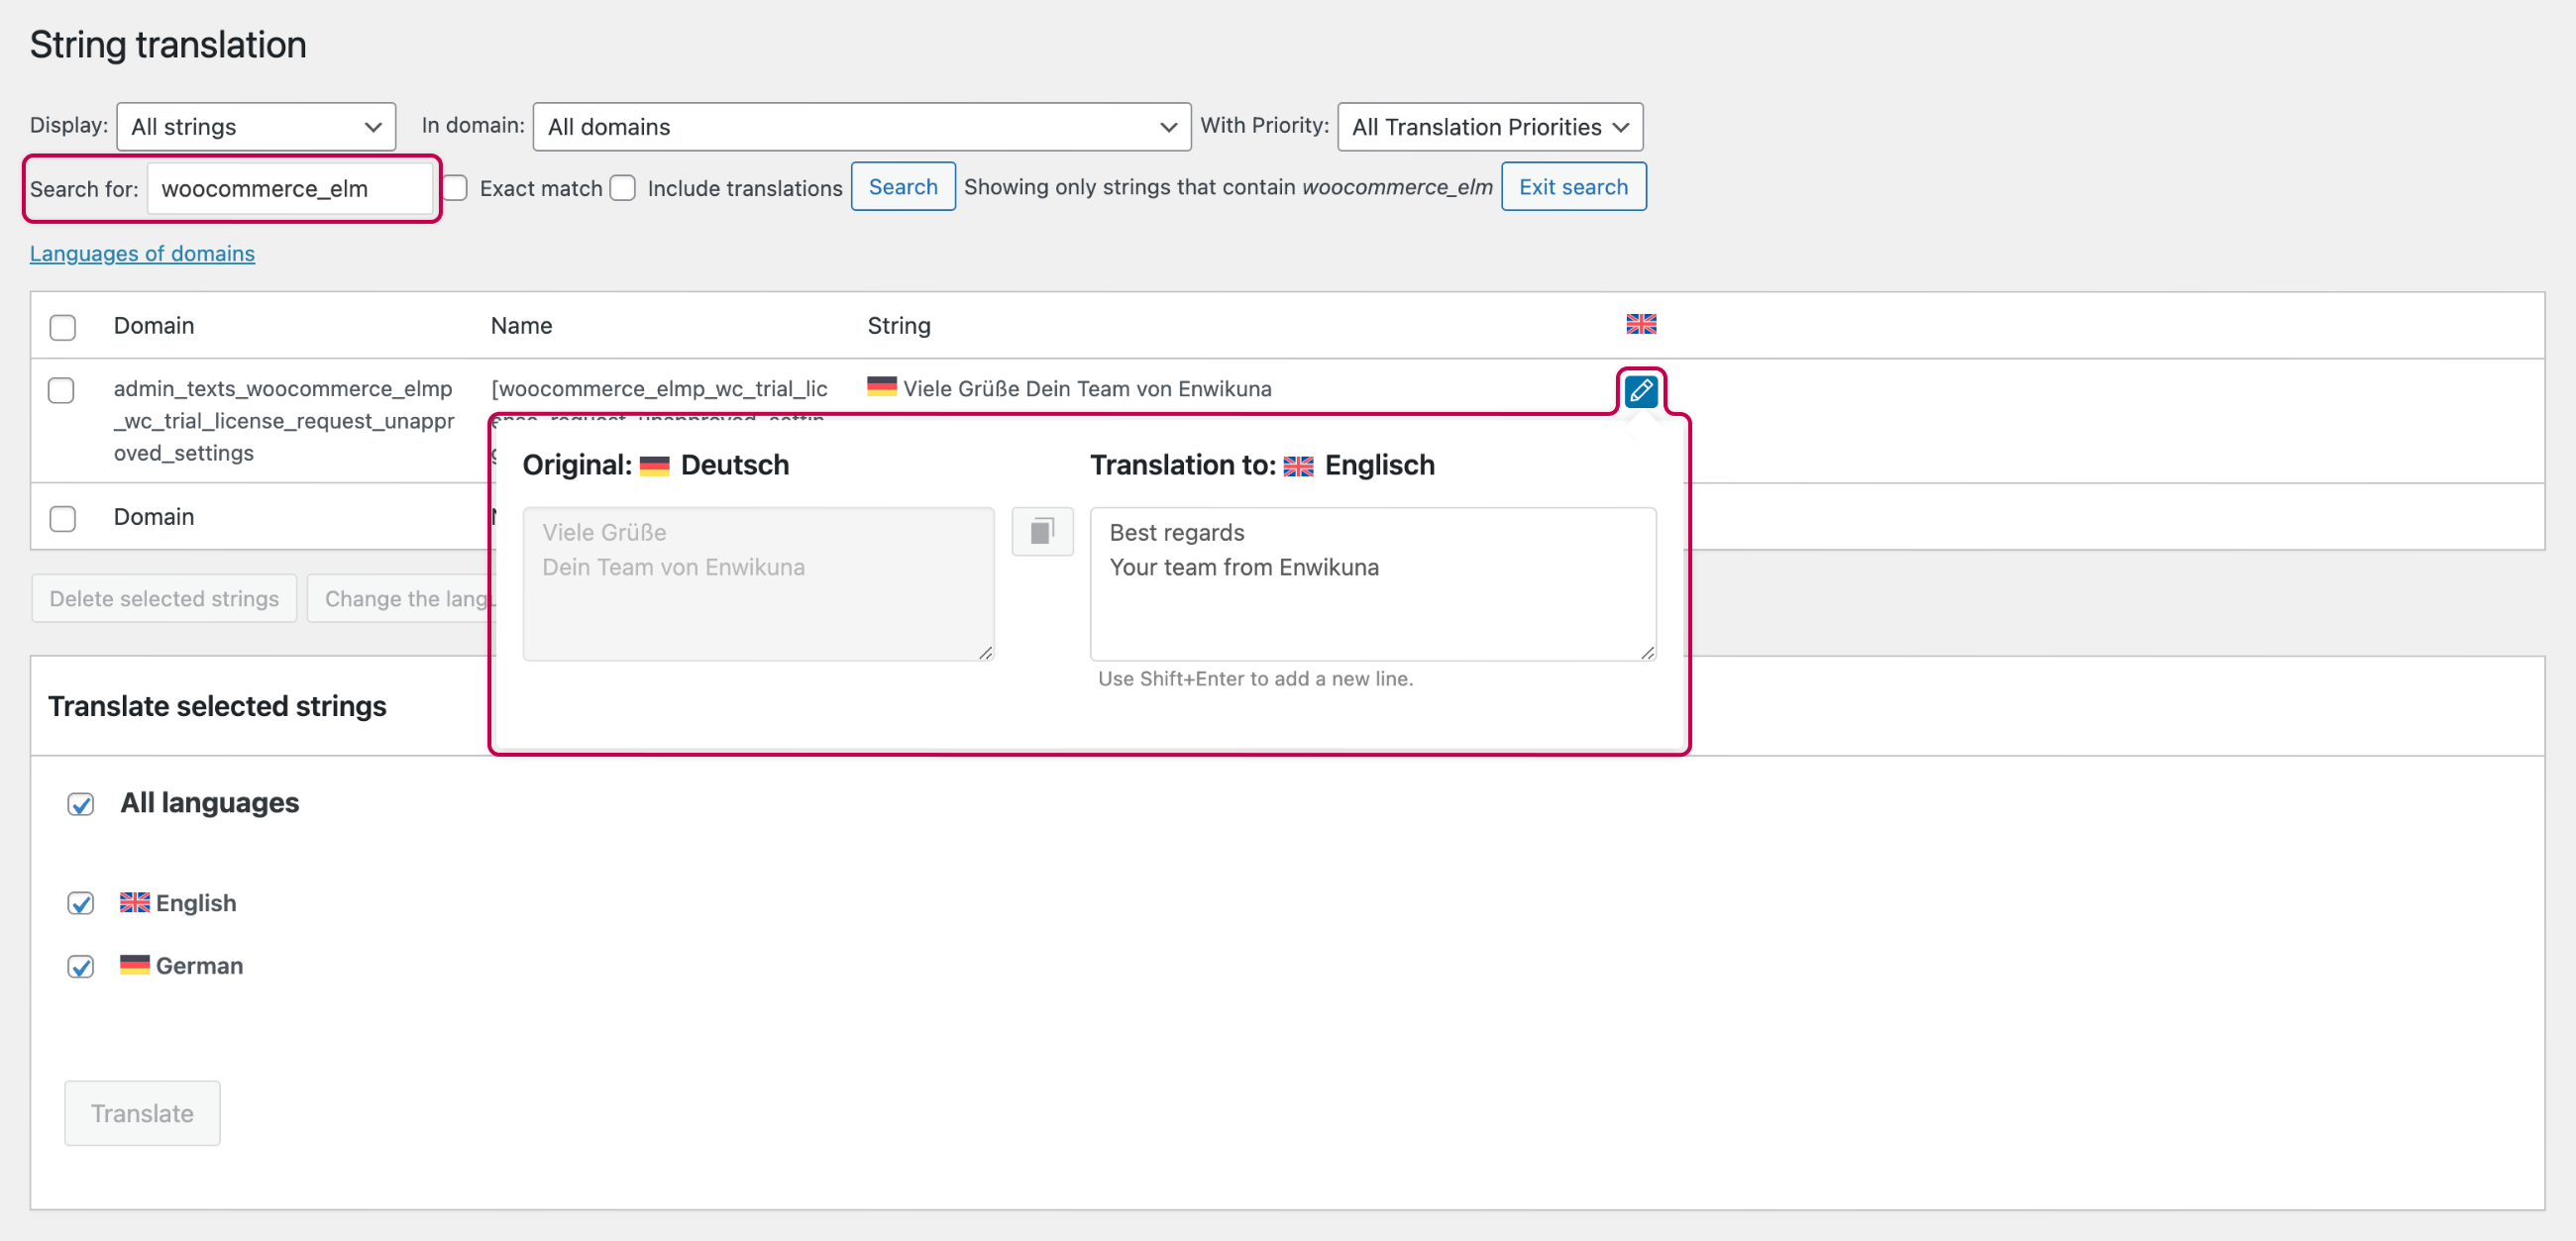
To do this, go to WPML > String Translation on the left side of the dashboard. A page will then open where you will see a lot of text. Don’t let this irritate you! Now enter the text woocommerce_elm into the search field above and start the search by clicking on the corresponding button.
If you have made adjustments to the emails, you will then be shown a list of texts which you can now translate into all the languages you have set.
Customize plugin texts
Basically, Enwikuna License Manager & Enwikuna License Manager Pro is 100 % translated into the languages listed above. However, if your language is not listed and the translation of Enwikuna License Manager on translate.wordpress.org or the creation of a .po file for Enwikuna License Manager Pro is too complex for you, you can use WPML to modify or add existing translations.
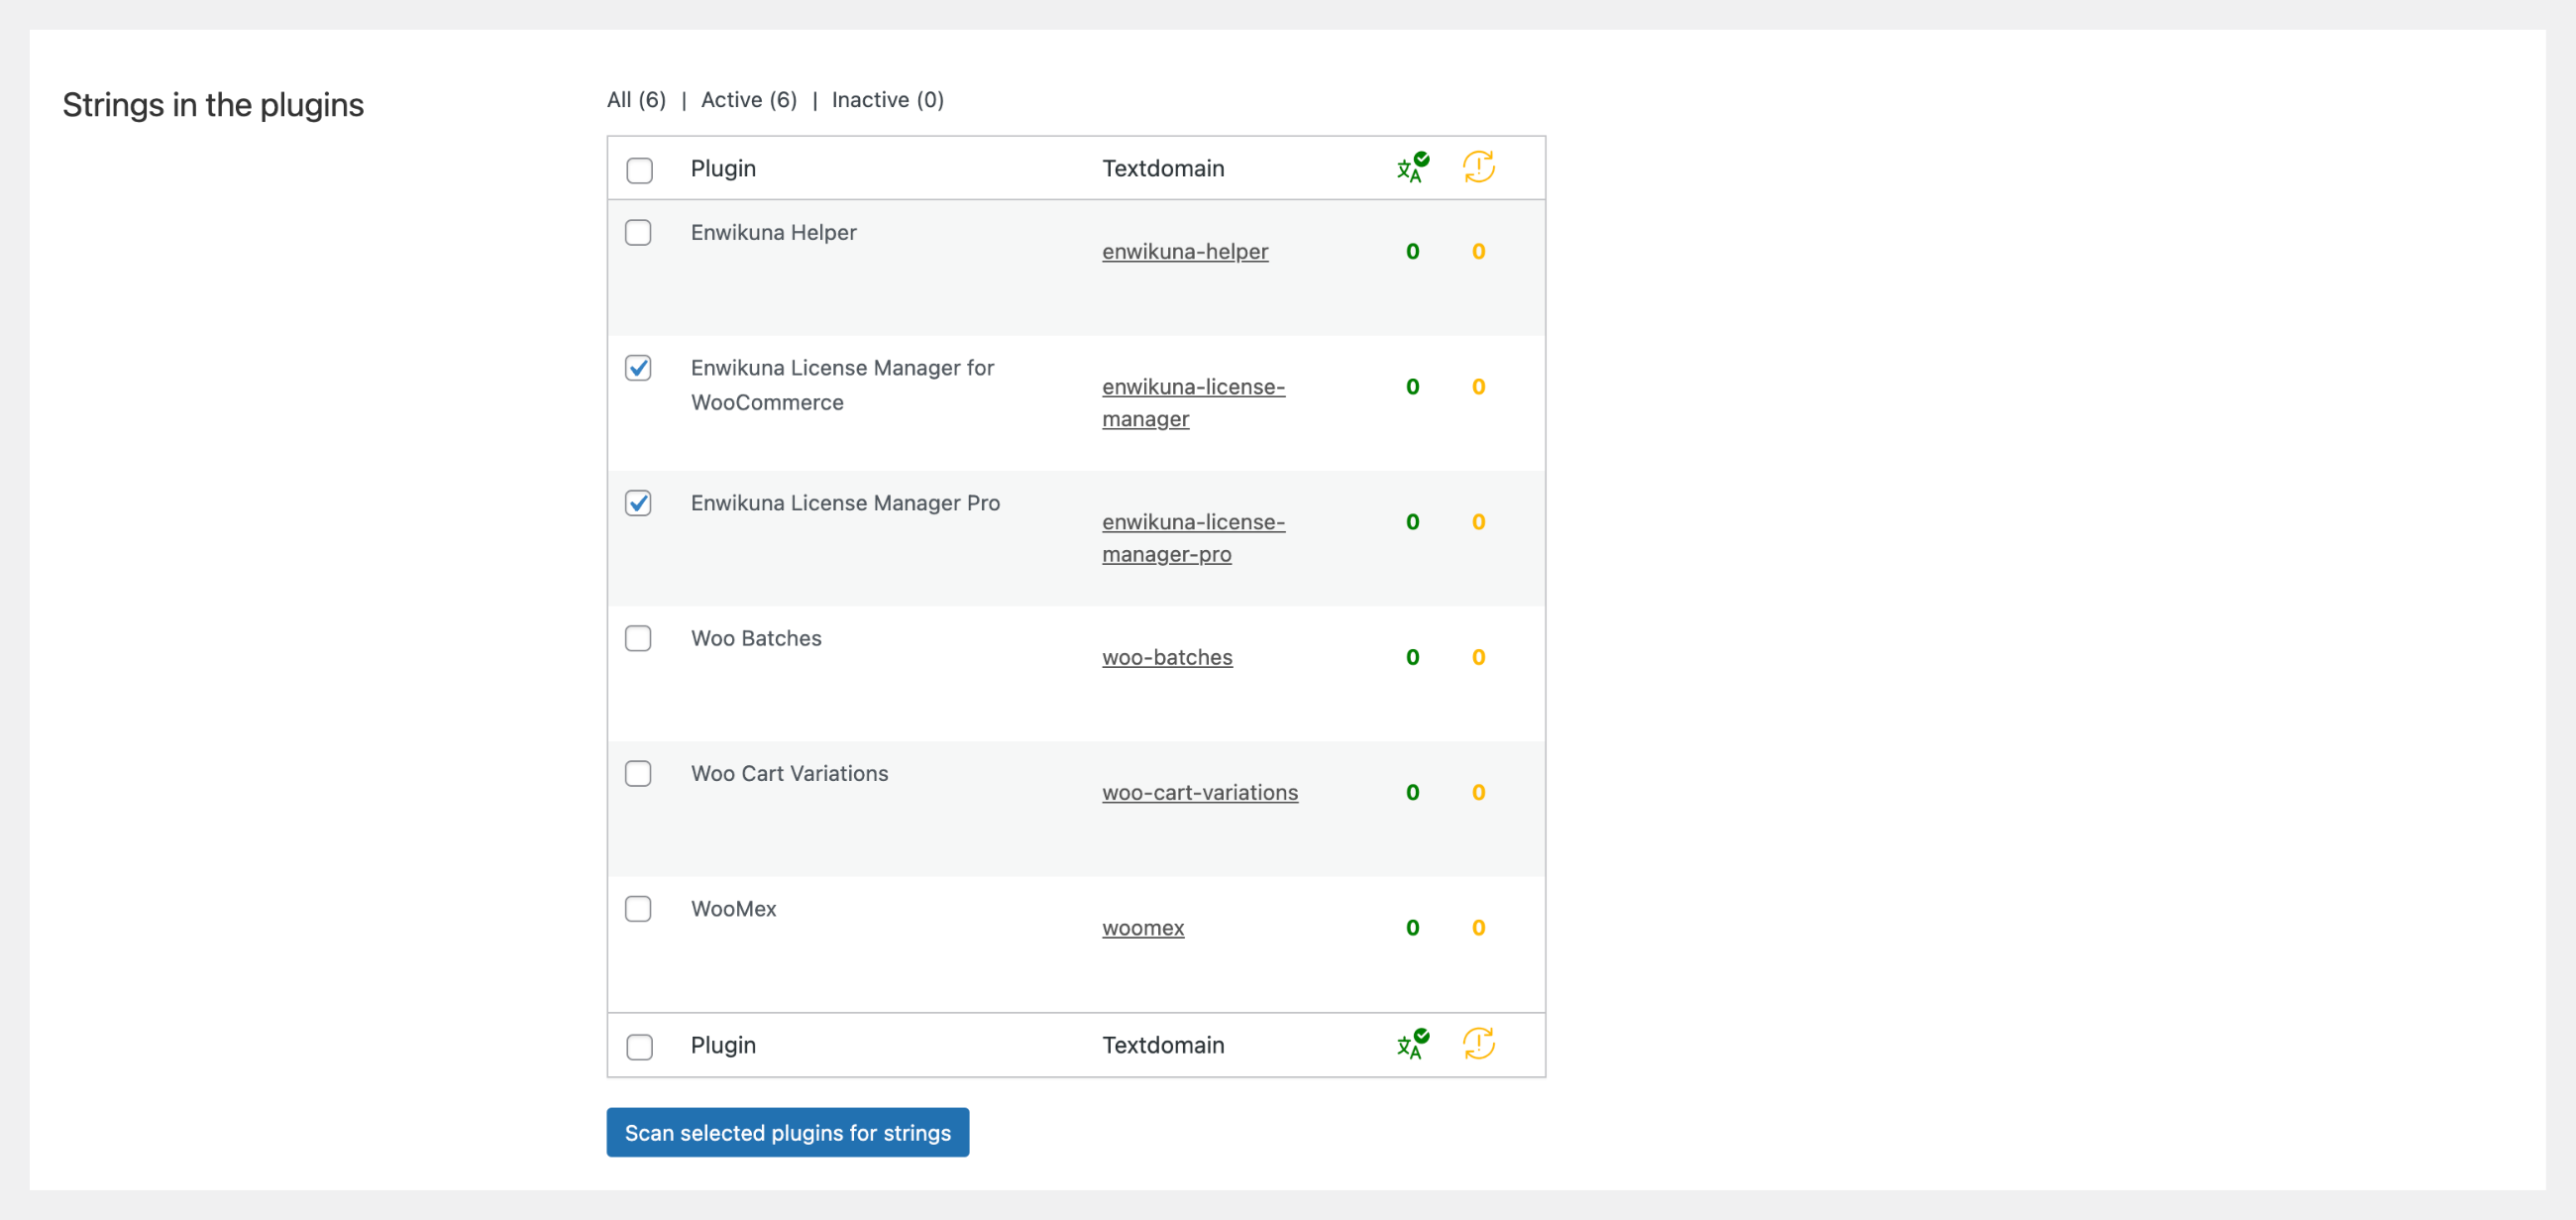
In order for WPML to perform the translation for Enwikuna License Manager & Enwikuna License Manager Pro, you must first perform a search of the plugins for the strings. To do this, go to WPML > Theme and plugins localization on the left side of the dashboard. A page will then open on which you will see several sections. Now scroll down to the section Strings in the plugins. Select both plugins from the list and then confirm the search by clicking on the corresponding button.
After the search has been successfully completed, you must switch to the string translation. To do this, go to WPML > String Translation on the left side of the dashboard. A page will then open where you will see a lot of text. Don’t let this irritate you! Now select the domain enwikuna-license-manager or enwikuna-license-manager-pro and start the search by clicking on the corresponding button.
You should now receive a list of all strings from the selected plugin.
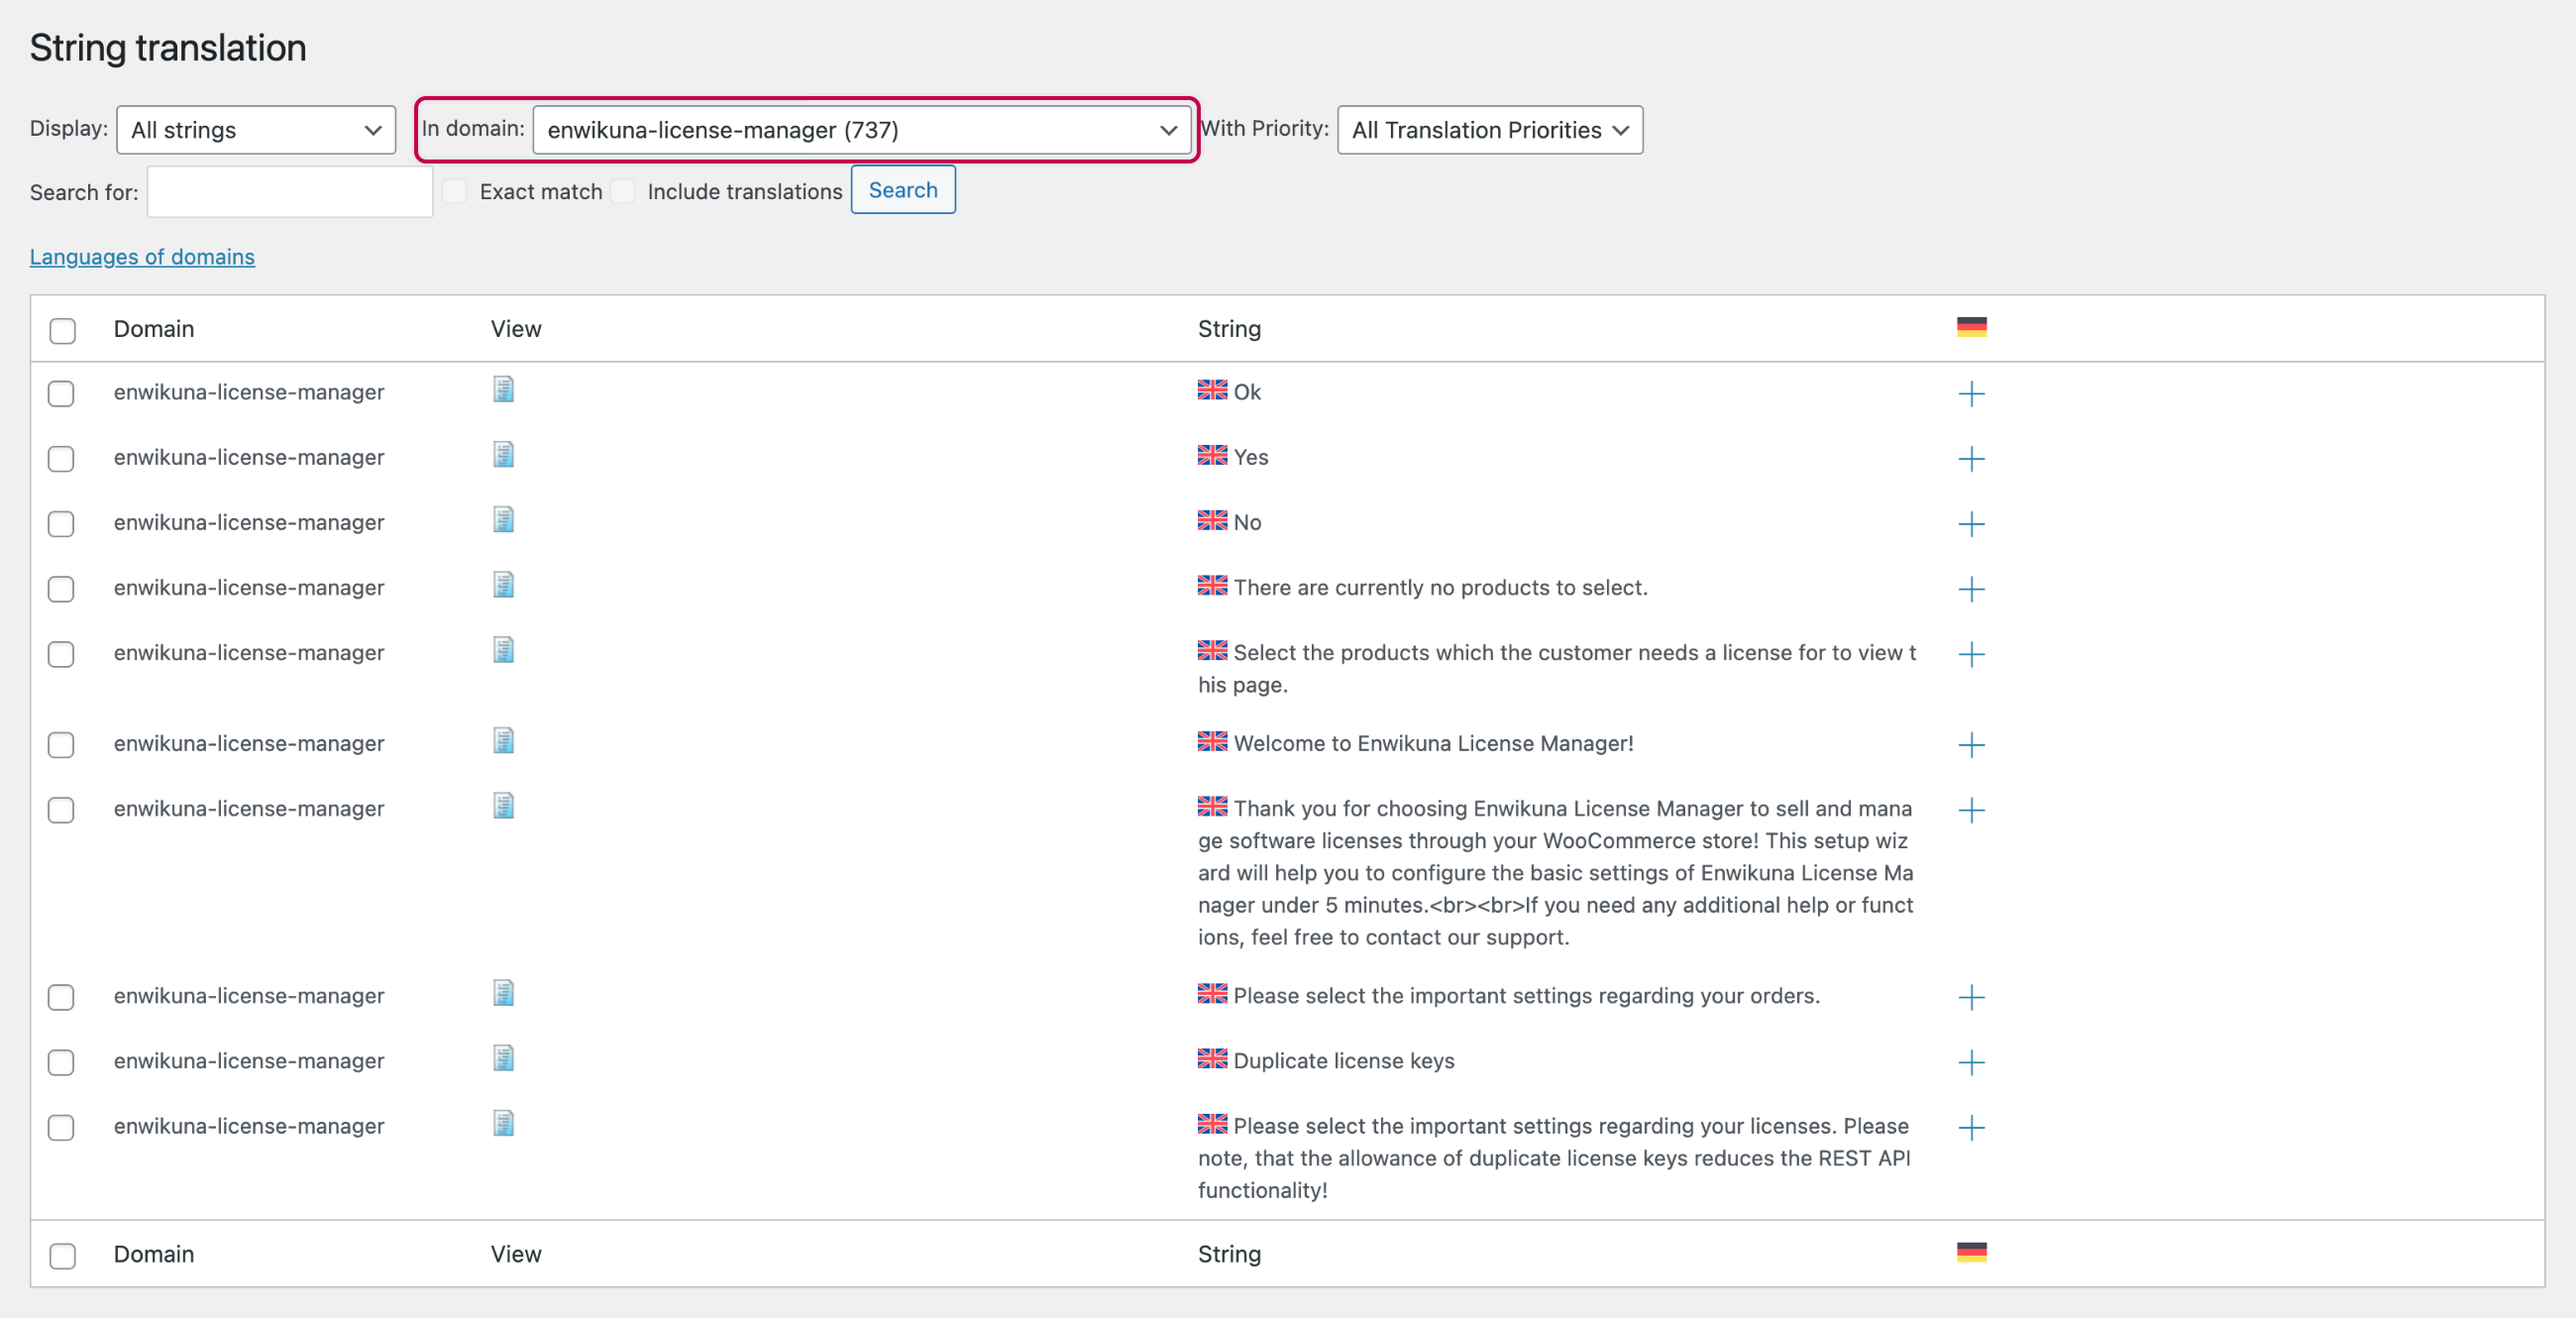
Next, add your translation for the desired language by clicking on the button for adding a new translation of an entry within the list.